Contents of this page:
| Why OT/PPP? |
Long time readers of the 'Networkable Mac Games' pages already know that I'm always pushing users to install and use Apple's own OT/PPP over the software that typically ships from your ISP. The reason is that it is the only dial-up software that is fully PowerMac, and Open Transport native. This means that there is no emulated code standing between your OT-native program and the modem. The benefit is a more stable connection and faster throughput on web surfing and downloading. Nearly everyone who has upgraded has mentioned that they've noticed faster transfers, and things feel "peppier".
OT/PPP also becomes important as more and more games these days require Open Transport to be installed for networking. If you're using one of the "classic" dial-up software (essentially anything other than OT/PPP), then you are throwing a 68k-emulation wedge in between your program and the internet! As you can imagine, this is even more important when you want to play performance-demanding games.
I've found that, even though I continue to push OT/PPP to readers and friends, that many have been afraid to do so (there's always that "fear of screwing something up" factor) if I'm not there to walk them through it. Well, this page will guide you through one step at a time.
The beauty of OT/PPP is that, because it uses technology radically different than others, you can actually install OT/PPP along side your other dial-up software and not have to worry about a conflict. So, if you're not completely sold, you can easily switch back (this is not the case with any other software). So, you can actually have both installed, and switch between both at anytime in between sessions!
Myth: I was told I must use the dial-up software my ISP provided.
Not true. The main reason they tell you this is because the software they send you is what they licensed, were trained on, are familiar with, and support. Understandably, if I were an ISP, I wouldn't want to have to support every known and unknown PPP dial-up software either. But, the PPP protocol is standardized, and if you're comfortable with the software, you can run any software you want and the ISP would probably never know (and shouldn't care).
Upgrading: Is OT/PPP right for you?
While OT/PPP sounds all well and good, it may not be for every computer. While it will work for any computer that can run MacOS 8 (All PowerPC and 68040 Macs), some of the earlier Performa-based PowerMacs don't have the "GeoPort" serial architecture that is optimal for running OT/PPP. I don't know why Apple crippled these machines with the old-style serial port, other than to save money on these low-end systems. These Performas also have vastly inferior video, making them poor gaming machines (video buffering and scrolling is very poor on these machines). Compare a game like Marathon on a 603 to a 601, and the 601 computer will blow it away. If you have one, you have my sympathies.
If you have a 601, 604, 604e, or a G3, you're in good shape. Later 603e computers do have the proper GeoPort, but I suggest you check Apple's web site for your computer. The spec sheet will tell you if your computer does or not.
For a technical explanation, Steve Dagley (lead programmer of the ever popular FreePPP) explains the difference between OT/PPP and FreePPP (the traditional PPP):
On faster PowerPC Macs that have the SerialDMA driver (which is built into System 7.5.3 and later but only works on a Mac with the GeoPort serial architecture) OT/PPP should have the edge over FreePPP in transfer speed. This is because the SerialDMA driver is PPC native and OT/PPP doesn't incur a 68K emulator mode switch when sending/receiving data from the serial port. On Macs without the GeoPort architecture the serial driver runs in 68K emulation so OT/PPP gets hit with a mode switch every time it receives data. This apparently imposes more overhead on OT/PPP than FreePPP, which is already running in 68K mode so there's not a mode switch to access the serial port, giving the edge on these machines (such as the PowerBook 5300) to FreePPP. Your mileage may vary.Note - I have not tried to benchmark the performance of FreePPP vs. OT/PPP nor am I interested in doing so since I do not consider them to be competing products. They're both free and the decision of which to use depends on which offers the features the user wants.
Before you begin: Make sure you write down any relevant information you think you'll need, just in case the worse happens.
| Getting the Software and Installing |
Version 1.0.1 of OT/PPP is included on your System 7.6 or later CD (including the MacOS 8 CD). If you have the System 7.6 or later CD, do not download 1.0 (linked below), as 1.0.1 fixes a couple bugs found in 1.0, including a potential conflict between the 'Serial Port Arbitrator' and other extensions (like fax software or drawing tablet software).
Download Apple's OT/PPP 1.0 (2990k) - Download only if you are using a system prior to 7.6.
Run the Installer (self explanatory); it'll place all the extensions, control panels, and configuration files where they belong. Restart the Mac, when directed.
| Setting Up OT/PPP For The First Time |
After restarting, from the Control Panels, open the 'Modem' control panel:
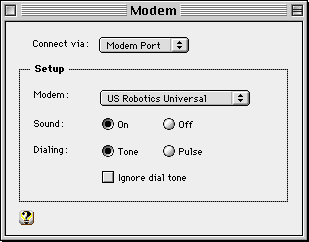
- Your modem should be plugged into the modem port on your computer. If it is not, you can select the port from this pop-up menu.
- Select your modem from the selected list in this pop-up menu. In this example, I have a US Robotics 28.8 Fax/modem, so I've selected the 'US Robotics Universal' configuration.
Next, open the TCP/IP control panel. If you were connecting to the internet via dial-up already, then it should be mostly configured already. Simply change the "Connect via:" pop-up field to 'PPP'. and make sure the "Configure" field is set to "Using PPP Server". My Configuring TCP/IP for a Private Network page has a better explanation of these fields.
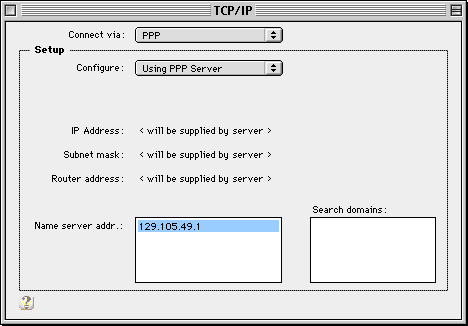
- Connect via: This selects how you want to connect, in this case obviously via PPP.
- Configure: Most users will likely select 'Using PPP Server', but some ISPs assign a "static" IP (meaning the IP is assigned only to you and no one else), in which case you will have to select 'Manually' from this pop-up menu. In other more rare instances, some people may need to select BootP or DHCP. If you're not sure, check with your Internet Service Provider.
- In most cases, these fields will be filled in upon connection (which is why you cannot edit these fields). Once connected, you can see your IP address by opening this TCP/IP panel.
- Name Server Address: Commonly referred to as DNS, this computer tracks the IPs of computers around the world, and is how surfing the web is so fast (even on congested days when those pages just can't seem to download quickly enough). In some cases, you may have a couple sets of numbers here, in case the primary server is down.
- Search Domains: This field is optional, and can safely be left blank.
Almost done, now open the PPP control panel:
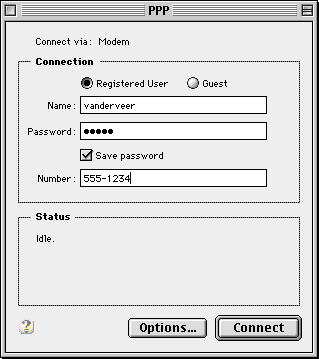
- Name: Enter your dial-up user name. This is not necessarily the same as your email address.
- Password: Again, this may not be the same password as your mail (depends on your ISP). Click the checkbox if you don't want to have to enter it every time you connect.
- Phone Number: Enter the phone number you use to dial up.
That's it! You're done! You can now connect (or continue down to get more from OT/PPP).
| Setting Options |
You will probably want to configure some of the options to fit your tastes and work habits. From the main PPP control panel, click the 'Options' button to bring up the preferences panes:
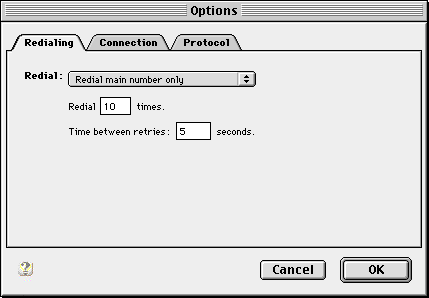
You will probably want PPP to redial automatically if it gets a busy signal. Default is off, click the pop-up menu and select the option that fits your needs and enter the number of times you want PPP to redial before giving up.
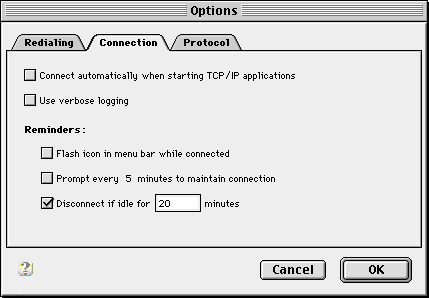
Again, personal preferences here. These are how I have mine configured:
- Uncheck "Connect automatically when starting TCP/IP applications" - Mainly because I work with a lot of Internet programs offline (like composing email or proofing web pages), and I don't want my modem dialing everytime I open a new program.
- Uncheck "Flash icon in menu bar while connected" - Well, I find it distracting... ;-)
- Change "Disconnect if idle" from the default 10 minutes to 30 minutes - 10 minutes is too short for me, I can't reply to email that fast! ;-)
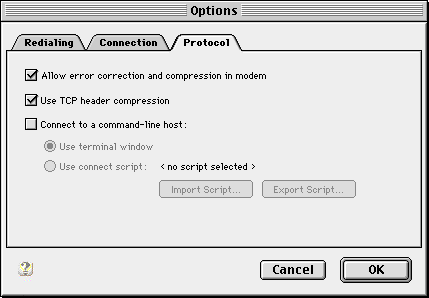
- "Allow error correction and compression in modem" setting should vary depending on whether you intend to surf (browse the web, email, etc.), or play games over the Internet. My Game Performance Tuning page explains in detail why you want to do this. See below making different configurations.
- Always, always, always leave "TCP Header Compression" checked!!! Here's an explanation why from one of Apple's Sprocket's programmers:
It is a VERY bad idea to not compress the header. Consider a TCP stream. If the game wants to send, say, 4 bytes of data (as many games do), the overhead for that 4 bytes is 20 bytes of IP header and 20 bytes of TCP header. The transmit time at 28.8 kbps is 15 milliseconds.
The PPP header compression will reduce the headers down to about 3 bytes. Leaving you with 7 bytes to send, taking 2 milliseconds, saving you 13 milliseconds.
Compare that to the, say, 5000 cycles you save by not compressing:
5000 / 100MHz = .05 milliseconds.You can see that header compression wins by a long shot.
- This last section can be used to aid in connecting to ISPs when PPP refuses to fully connect by itself (some ISPs may have a slightly different login procedure).
| Making Different Configurations |
OT/PPP allows you to save different configurations, which can be very handy if, for example, you are a Powerbook user and you want to save the dial-up phone number with different area codes. I find it handy to save different configurations for gaming, where I can save a configuration with "modem compression" turned off (see above screenshot).
To open the configuration window, select 'Configurations...' from the File menu, or hit Command-k.
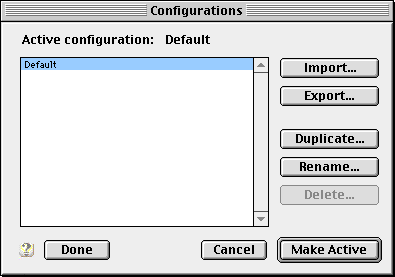
If you only have one configuration, or are setting up OT/PPP for the first time, this is what you will see.
The first thing I do is rename the 'default' configuration to 'surfing', so I can see at a glance what configuration I'm using (click the 'Rename' button). The configuration shows up in (parentheses) in the title bar of the main PPP window.
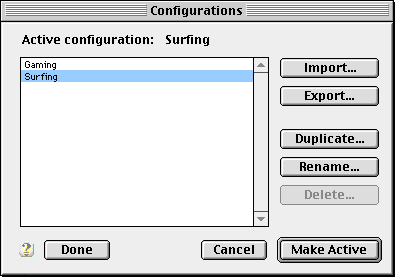
Next, I duplicate that script (click the 'Duplicate' button) and name it 'gaming'. Then, select the 'gaming' configuration and click make active to take you back to the main PPP window. Go into the options window (click the 'Options' button), click on the 'Protocols' tab, and uncheck the "Allow error correction and compression in modem" (Internet games perform better with modem compression off. See Game Performance Tuning page for details). Click Ok, and close the PPP control panel so that it will prompt you to save your configuration.
You're done! Now you simply have to hit command-k to switch between configurations!
© Copyright 1998 Rick VanDerveer